Table Transformations
Different ways you can optimize and perform table transformations.
In this module: schema behavior · aggregate tables · table inserts · snippets
Schema behavior
Database schemas let you apply a specific schema to a table or a set of tables. They are useful for limiting access to tables that are not needed for reporting, which simplifies building reports from the data warehouse.
Schemas can be applied to data warehouses, data sources and individual tables. Precedence runs from most specific to least specific:
- Schema settings applied at the table level win over
- settings applied at the data source, which win over
- settings applied at the data warehouse.
These are the schema behavior options available:

| Behavior | What it does |
|---|---|
| Main Raw default schema | Applied to all Raw (_R postfix) tables in the region. |
| Main default schema | Applied to the tables you manually assign it to. |
| None | Applied to all tables and views in the region. |

| Behavior | What it does |
|---|---|
| Main Valid default schema | Applied to all Valid (no postfix or _V) tables and views in the region. |
| Main Transfer default schema | Applied to all Transfer (_T postfix) views in the region. |
| Main Error/Warning default schema | Applied to the tables you manually assign it to. |
Use schemas to separate valid tables
Timextender uses the schema with the Main Default Schema behavior as the destination for any ETL process — it is the default destination for tables newly created during ETL. The Main Valid Schema, in contrast, is applied to all valid tables in the data areas. It conceals the tables involved in the ETL process so that other users only see the relevant items.
Create ETL schema as default and set MDW as valid schema
At the table level you can change schemas by adding or setting the schema you want from the drop-down in the table settings.
- Right-click → Database Schemas → Add Database Schema under the MDW data area.
- Enter
ETLand create the schema. - Once created, select Schema Behavior → Main Default Schema for
ETL. - Select Main Valid default schema for MDW.
Aggregate tables
Aggregate tables are streamlined versions of existing tables. They summarize data where the detailed transactional records are unnecessary — financial or sales reporting, for example. This lets you report directly from the data warehouse, so analysts get to the essential customer metrics quickly.
These aggregation types are available:
| Type | Result |
|---|---|
| Min | The lowest value of the field in question. |
| Max | The highest value of the field in question. |
| Count | The number of rows. |
| Count_Big | Same as Count, but can count higher than 2³¹ because it uses bigint instead of int. |
| DistinctCount | The number of unique values in the field. |
| Sum | The sum of all row values. |
| Average | The average of all row values. |
| String Agg | Output separated by a comma, ordered by the content of the column. |
Aggregate table for monthly sales by customer
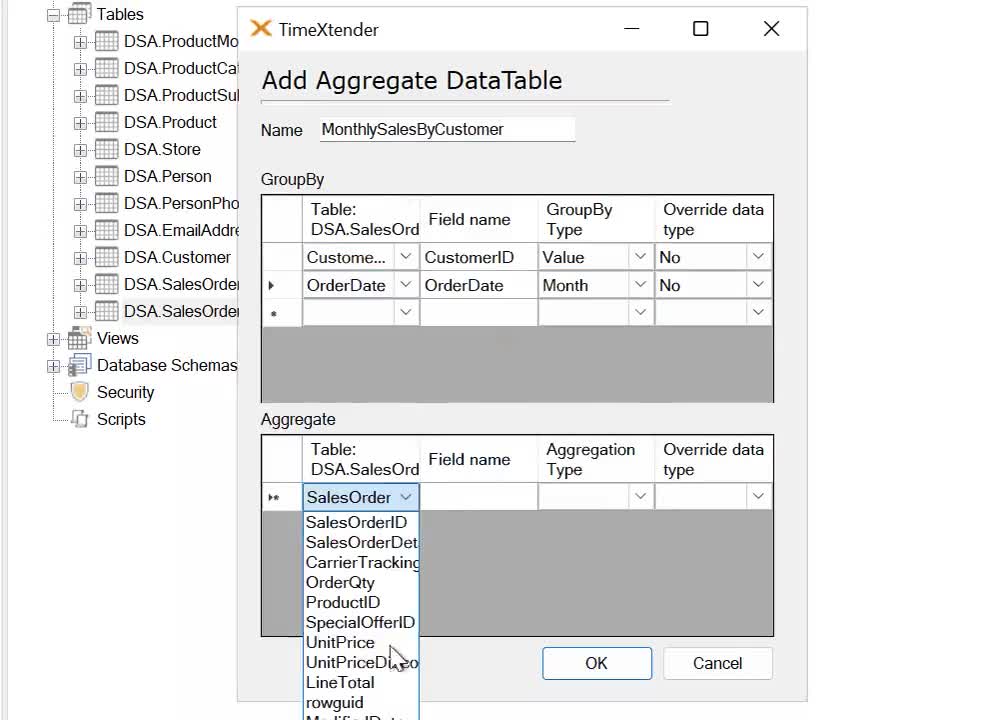
- Select Add Aggregate Table under Advanced on
DSA.SalesOrderDetail. - Enter
MonthlySalesByCustomeras the name for the aggregate table. - Select
CustomerIdandOrderDate(value as Month) as the Group By parameters. - Select
LineTotalas the aggregate parameter and Sum as the aggregate type. - Finish the table with OK.
- Deploy and execute.
Table inserts
Inserting rows of data from one table into another is called a table insert. It is a simple concept that maps data from one source into a table, and it comes with other important functionality such as incremental loads. You can also build SQL unions using table inserts.
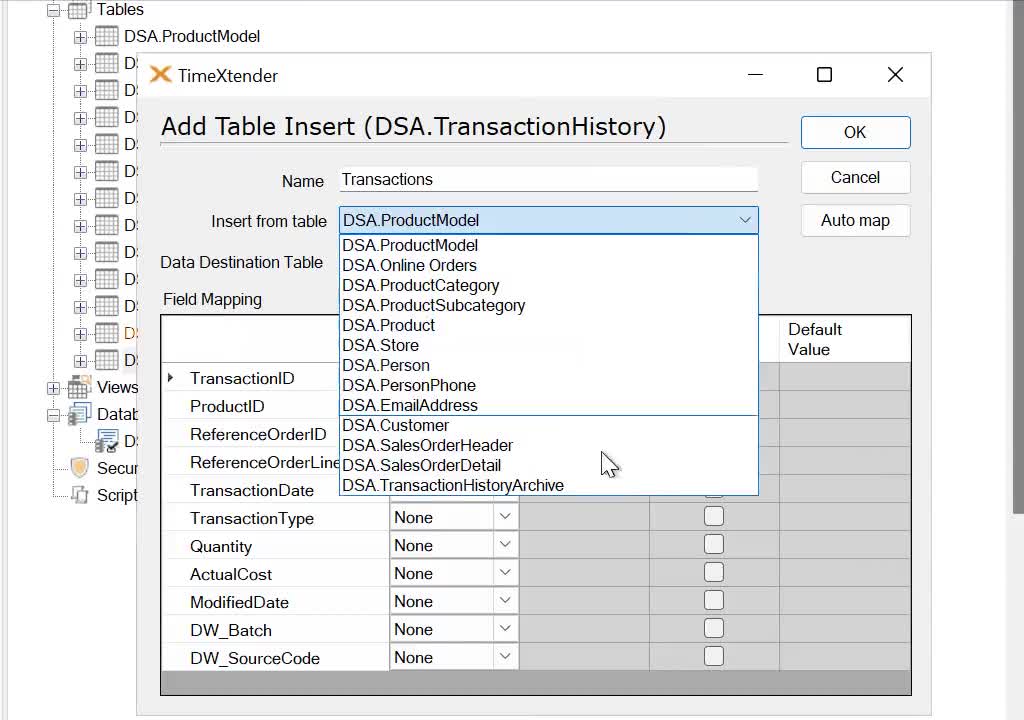
Add a table insert
- Add
TransactionHistoryandTransactionHistoryArchiveto the DSA. - Select Add Table Insert from Advanced on
TransactionHistory. - Provide
Transactionsas the name,TransactionHistoryArchiveas the insert-from table, and the data destination table (Raw or Valid). - Use the Auto map function to speed up the process.
- Alternatively, select each mapping manually in the Field Mapping area.
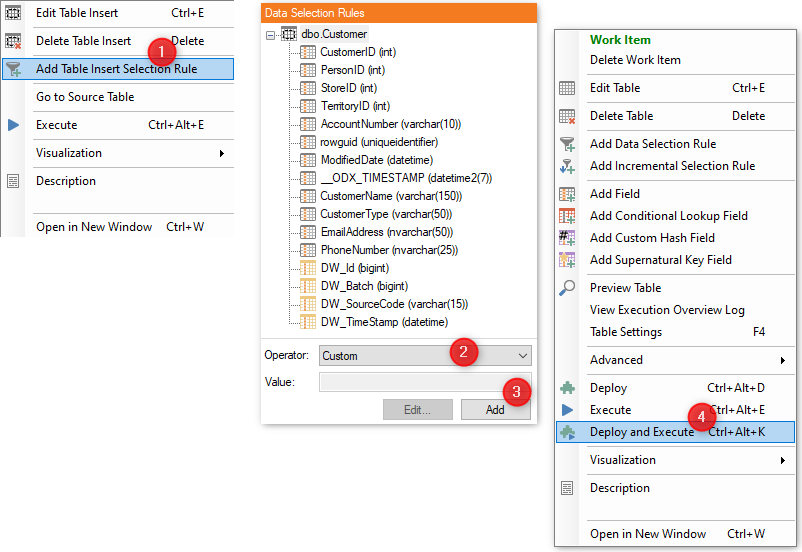
Add a table insert selection rule
- Select Add Table Insert Selection Rule from Table Inserts on your destination table.
- Select the operator you want to use to select the data.
- Add the value to select the data. Click Add.
- Deploy and execute the table.
Related reference
- Slowly Changing Dimensions — track history on the tables you transform.
- Optimization — performance settings for the tables you build here.
- Prepare instance — where these transformations live.
Discussed in the community
Looking for related questions…
Didn't find your answer? Ask the community about this page — questions are answered by Timextender experts, partners and other users.